
Are you a freelancer, online seller, or remote worker looking for a safe and effective way to get paid? Look no further than Payoneer, the leading online payment platform that allows people and businesses to send and receive money worldwide. In this comprehensive guide, we’ll show you how to create a Payoneer account so you can start enjoying the benefits right away.
Step 1: Getting Started with Payoneer
To begin Create a Payoneer Account, follow these initial steps:
1. **Visit the Payoneer Website**: Head over to the official Payoneer website (www.payoneer.com) to initiate the account creation process.
2. **Sign Up for Free**: Look for the “Sign Up” button prominently displayed on the homepage. Click on it to start the registration process.

Step 2: Registration Process
Creating your Payoneer account involves providing some basic information. Here’s what you need to do:
1. **Choose Your Account Type**: Decide whether you’re signing up as an individual or on behalf of a business. Select the option that best suits your needs.
2. **Enter Your Personal Details**: Fill in your full name, email address, date of birth, and select your country of residence. Payoneer needs this information to verify your identity and ensure compliance with regulations.
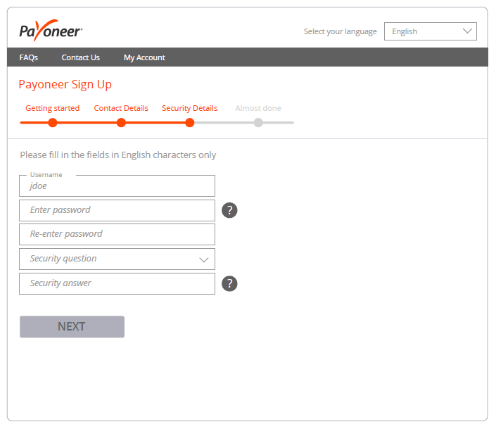
3. **Create Login Credentials**: Choose a strong password. Make sure it’s memorable yet secure. Additionally, set up security questions that only you can answer to enhance the security of your account.
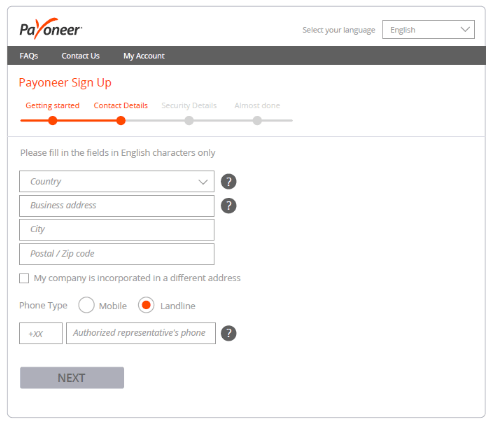
4. **Provide Contact Information**: Enter your current address and a valid phone number. This information helps Payoneer communicate important updates and notifications about your account.
5. **Review Terms and Conditions**: Take a moment to read through Payoneer’s terms of service and privacy policy. Once you’ve reviewed and understood them, tick the box to indicate your agreement.
6. **Submit Your Application**: Click on the “Next” or “Submit” button to proceed. Congratulations! You’ve completed the first stage of the registration process.
Step 3: Verifying Your Email Address
After submitting your registration details, Payoneer will send a verification link to the email address you provided. Here’s what you need to do to verify your email:
1. **Check Your Inbox**: Open your email inbox and look for the message from Payoneer. It usually arrives within a few minutes of completing your registration.
2. **Click on the Verification Link**: Simply click on the link provided in the email to verify your email address. This step confirms that you have access to the email account you used to register.
3. **Confirmation**: Once you’ve clicked the link, you’ll be redirected to a confirmation page on the Payoneer website. Your email address is now verified, and you’re one step closer to completing your account setup.
Step 4: Providing Additional Information
Depending on whether you’re registering as an individual or a business, Payoneer may require additional documentation to verify your identity or business credentials:
1. **Individual Accounts**: You may be asked to upload a copy of your government-issued ID, such as a passport or driver’s license. This step is necessary to confirm your identity securely.
2. **Business Accounts**: If you’re signing up on behalf of a business, you’ll need to provide additional documentation, such as business registration certificates or tax identification numbers (TINs). These documents help verify your business’s legitimacy and ensure compliance with regulatory requirements.
Step 5: Account Approval and Setup
Once you’ve submitted all the required information and documents, Payoneer will review your application. If everything checks out, your account will be approved, and you’ll receive a confirmation email. This email will contain important details on how to proceed:
1. **Log In to Your Account**: Use the credentials you created during registration to log in to your Payoneer account for the first time.
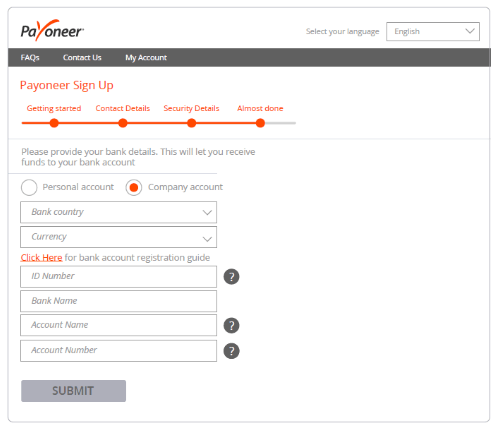
2. **Set Up Payment Methods**: Link your bank account or credit/debit card to your Payoneer account. This step enables you to receive payments from clients, marketplaces, or platforms directly into your Payoneer balance.
3. **Explore Your Dashboard**: Take some time to familiarize yourself with the Payoneer dashboard. It’s your central hub for managing transactions, viewing balances, and accessing customer support whenever you need assistance.
Step 6: Receiving Payments
With your Payoneer account set up and ready to go, you can start receiving payments from clients or businesses worldwide:
1. **Share Your Payment Information**: Provide your Payoneer account details (such as your account number and routing information) to clients or platforms that need to send you payments.
2. **Monitor Transactions**: Keep track of incoming payments through your Payoneer dashboard. You’ll receive notifications whenever funds are added to your account.
Step 7: Withdraw and Transfer Funds
Payoneer offers various options for accessing and transferring your funds securely:
1. **Withdraw to Bank Account**: Transfer funds from your Payoneer account directly to your linked bank account. It’s a convenient way to access your earnings quickly and efficiently.
2. **Payoneer Prepaid Mastercard**: Consider ordering a Payoneer prepaid card, which allows you to withdraw cash at ATMs worldwide or make purchases online and in-store.
3. **Global Bank Transfer Service**: Utilize Payoneer’s global bank transfer service to send funds to other Payoneer users or international bank accounts. It’s a cost-effective solution for international payments.
Conclusion
Creating a Payoneer account opens up a world of opportunities for managing international payments with ease. By following the step-by-step guide outlined above, you can set up your Payoneer account confidently and efficiently. Whether you’re a freelancer looking to receive payments from clients abroad or a business owner making cross-border transactions, Payoneer provides the tools and support you need to streamline your financial operations. Start your journey with Payoneer today and experience the convenience of global payments at your fingertips.
Remember, if you encounter any issues during the account setup process, Payoneer’s customer support team is always available to assist you. Happy banking with Payoneer!
—
This blog post aims to guide users through the process of setting up a Payoneer account in a clear and friendly manner, ensuring they feel confident and informed every step of the way.